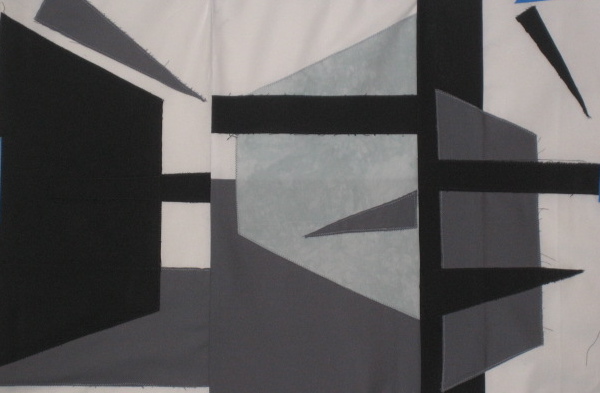
Well, shortly after my last post, I found the art of Ton Schulten online, and just fell in love with his rich colors, interesting divisions within the paintings, and organic shapes. So I went to Amazon and found that I could buy nice large calendars with his art, but they were pretty expensive. So I looked at what it would cost to buy a calendar from last year or the year before. You wouldn't believe how expensive THEY are. So I decided to "invest" in the current year.
One picture "spoke" to me, and I decided it would be fun to copy it in fabric. I built it from right to left, one section at a time, and each day it was so exciting just to see it develop. Here's my copy (not a really good photo of the intense, and close-in-value colors, I'm afraid):

And here's a little close-up of quilting I practiced on it:
Now, of course, it's a copy....an exercise...which I could share with friends, but never "show" or sell, so I handed it off to my son, Alec. I hope he likes it; I like it! Thank you, Ton.
You may remember my Pelican quilt from several seasons ago?
It was made in honor of Laura Quinn, who founded and ran a wild bird sanctuary in Florida, and the quilt had returned home from a show, so I wrote to Ms. Quinn, included a photo, and asked if she would like to have the quilt as a donation, which she might raffle off to raise money for the sanctuary.
I waited and waited --- no response. "I guess she didn't like it", I thought. Then, many months later, someone from the Sanctuary wrote me a letter telling me that Ms. Quinn was dead. Her small staff had cleaned out her office and in the back of a desk drawer, they found my letter to her. They asked if I were still willing to donate the quilt, and I said I'd get right on it!
Now, unfortunately, the Florida coast was hit with big storms and wild flooding, one of which virtually knocked out the Sanctuary, so this brave little band of good souls had to rebuild it, on the other side of the road, farther away from the unprotected coast. But once they got things sorted out, I received the nicest letter, which (blush) I'd like to share with you. It says:
"....the quilt is magnificent. We are going to hang it in the main entrance at the education center/gift shop. I was so thrilled to receive such a wonderful piece. We will not be selling it! Your talent and generosity are beyond words. I will send a photo of the quilt in it's new home."
So, if you're ever traveling in the south of Florida, do stop in to the
Florida Keys Wild Bird Center
Emergency Wild Bird Hospital and Sanctuary
93600 Overseas Highway
Tavernier, Florida 33070
and say "Hi" to Lynda Munshower for me.
* * *
My Twelve Connected group is still running. The March challenge was
"BIRD." Seems like I'm seeing a lot of birds in quilts recently, so I wanted to
do something different, and the first image that popped to mind was Lady
Bird (Johnson), a woman whom I'd long admired for her concern about
the land and preserving wildflowers.
So here's my little 11 x 17" quilt, "Lady Bird":
Speaking of flowers, since I had my flower fabric all over my sewing room, I made another little, subtle iPad cover:
A flower in my garden of grandchildren is little Ami, who began learning words! He had the big wall quilt I'd made him (shortly after he was born) hung over his diaper table, and he'd stand and point to little blocks and his momma would say the name....but some of those blocks were just "designs" or "plaid". So I figured I'd better whip him out an AMI'S WORDS quilt, one that he could sleep with, sit on, drag around, and so forth. I cut out every "object" I found in my stash, and then filled in with home-made images and a few letters.
Here's Ami's Word Quilt.........
And here's Ami, giving Dave a word or two:
My final sharing on flowers is to show you some of the gardens we've made around our little townhouse. First thing, of course, was to GET RID OF ALL THE GRASS. Inside the back fence, my concept was to have a patio that sort of floated in the flowers of the garden. Dave built the fence, the wood deck, and the fancifal blue bike/garden shed, even putting in an old stained glass window on one side. Here's a view from the rear of the backyard:
....and here's the view from the other direction:
I love certain greens and purples together, so.....
Now around to the front of the house, where you can see the Kissing Pig. This little pig is the star attraction for all the toddlers in the neighborhood. He comes up to about their belly buttons, and he must look like he's reaching up for a kiss.... and every toddler stops to kiss him. Some come by every day and do it. It's truly amazing!
* * * *
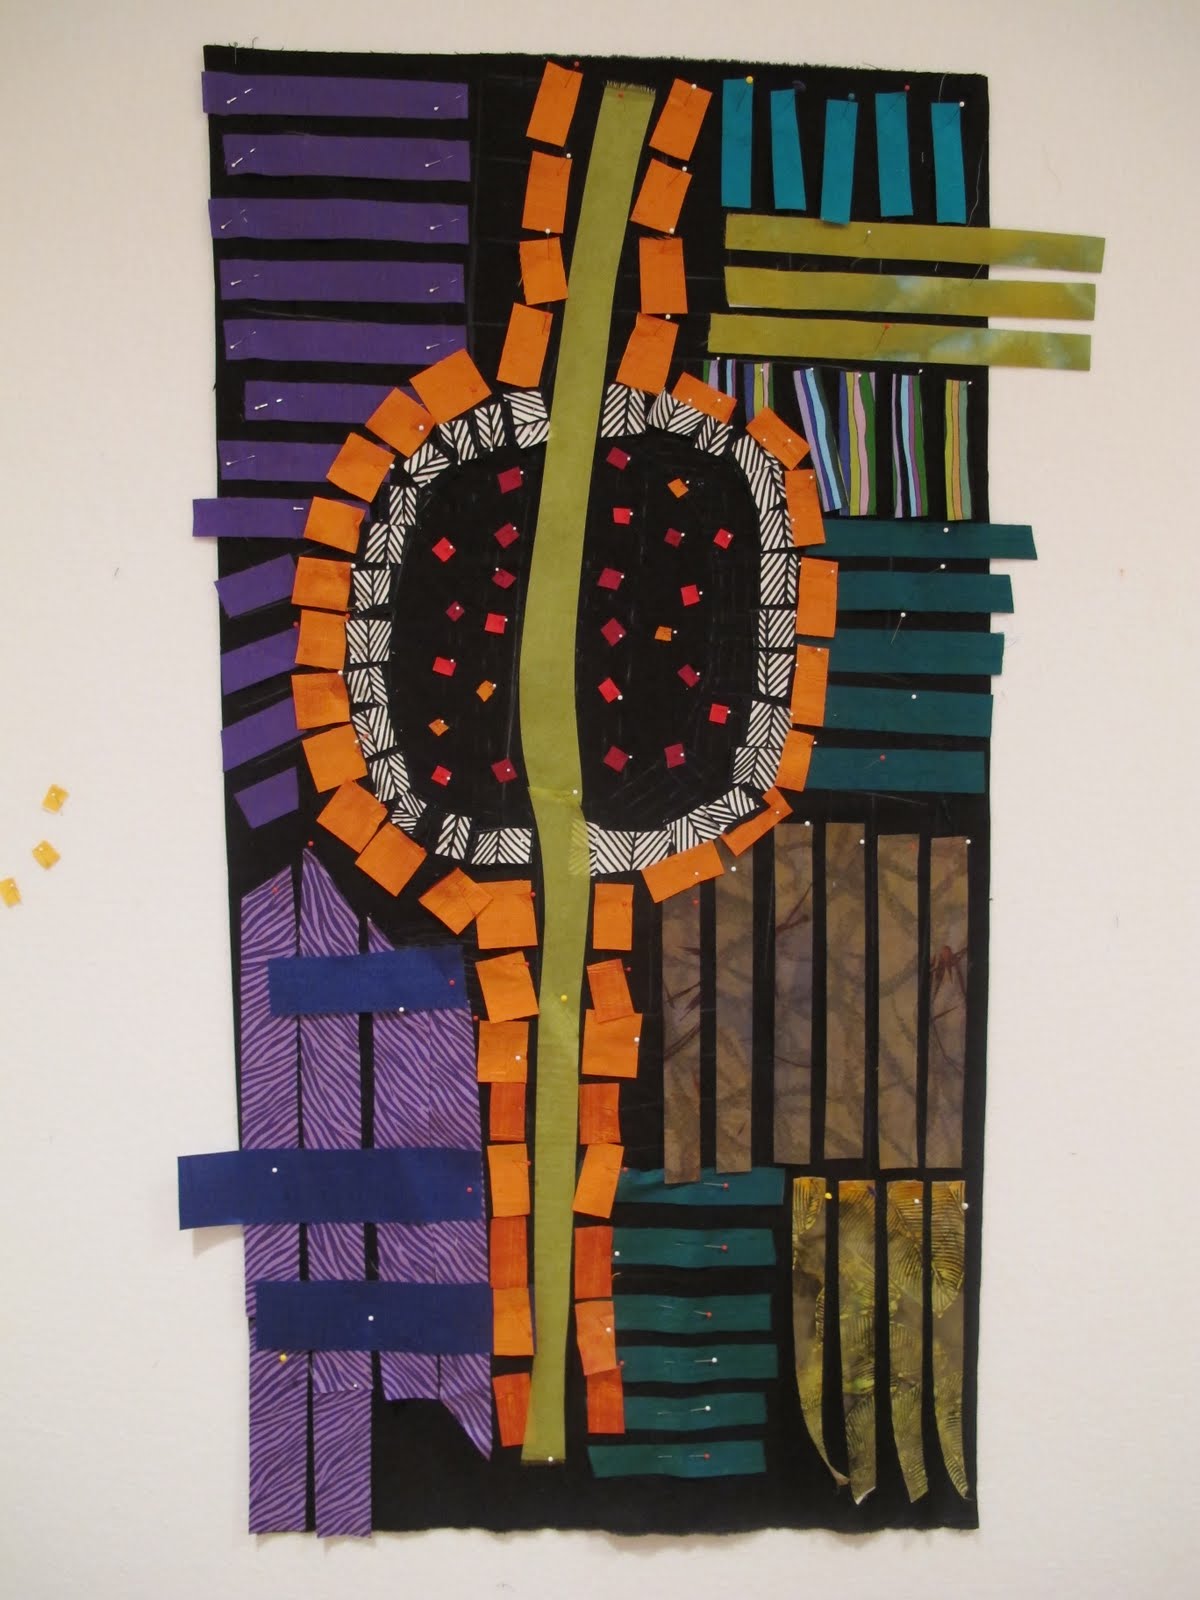
In May, I began an online course with Pamela Allen, an artist I've admired for years. The course was called "Faces and Figures", and was quickly filled up, largely, it seems, with Pamela's "groupies", who have taken her classes together for some time. We had four weeks, and were to do one project each week. I'll share what I did, but I wish I could show you the work of some of the "advanced kids" (who also seem to have magical stashes).
Our first assignment was to make a figure in a room with one object, such as a chair. We made a rough fabric draft, photographed and uploaded it to our group site, and Pamela would offer critique and -- even better -- she'd pull the post into her computer and make changes (I think, in photoshop) so that we could see what she was suggesting. Here's my finished project #1, which I call "Creamin' My Feet":

Project 2 was to focus on a face. Here's my (as yet) unfinished piece:

On this one, Pamela had some very serious critique (which I think is brilliant!). Here are some of her words: "Competent, illustrational, generic." She went on: "You are very good at drawing, but when you use a process such as this, reducing tonal shapes to a flat pattern, you strip the work of all personal, signature content. It is mechanically perfect!!! No tentative edges, no distortion that results in the artist's hand being present, no evidence of a change of mind as might be present in a spontaneous painting such as Modigliani himself has done....If we have a fully formed notion of the finished product, with a pattern and meticulously cut plain fabrics that correspond to certain flesh tones, there is no room for creativity! Now not everyone agrees with me about this. Many art quilt portraits are highly admired for their realism (usually due to manipulating a photograph and making a template from them). But where is the individual presence of the artist?"
On the third project, I decided just to "draw" with my scissors and be a little more playful (gulp). So here's my daughter dancing with her daughter (Ana) in an imagined environment. I call it "Dancin' at Glen Echo."
The last project was to have been the most creative, but I never got to the last phase before life stepped in. We were to compose a scene with people, then cut out a small rectangle from somewhere on the quilt, and build a brand-new image around it. All I managed to do was make the first image, and it's only pinned-together still. One day............
The figure is based on a young woman I saw sewing in a garden in London. Of course, there was no electricity; she's hand-cranking her machine with one hand, and feeding fabric with the other. She was one of many ecology-minded young people in the park that day.
* * *
I've been part of a 4-person color-study group for over a year; we've worked through many topics about color, doing little exercises along the way. As a result, I've become much more conscious of color connections, values, saturation, relationships around the color wheel, etc. What I recently learned, by doing the little fabric "sketches" below in analagous colors, is that I rarely use these combinations.
* * * *
This year I submitted a piece to Sacred Threads, which has been moved to a venue in northern Virginia. This year's show was probably the most moving quilt exhibit I've ever been to. There were quilts dealing with loss, grief, love, abuse, spirituality, and joy -- which was the spark for my submission. I took a quilt I had made several years ago, and reworked it. I cut off a good bit of the perimeter, took out the old quilting stitches and requilted the piece, added some hand applique, french knots, and embroidery, and redid the binding. It's called "Gotta Dance":
Here's a little closer shot:
You can't read the words that are under the dancing girls, but here's what it says:
- The urge to transform one's appearance, to dance outdoors, to mock the powerful and embrace total strangers is not easy to suppress
- The capacity for collective joy is encoded into us almost as deeply as the capacity for erotic love of one human for another. We can live without it, as most of us do, but only at the risk of succumbing to the solitary nightmare of depression.
- We are creatures who generate their own ecstatic pleasures out of music, color, feasting and dance
- Let us acknowledge the miracle of our simultaneous existence with some sort of celebration
These words are from "Dancing in the Streets: A History of Collective Joy" by Barbara Ehrenrich.
SAQA Auction
One of the most important groups to which I belong is SAQA, Studio Art Quilt Association -- from which I have learned much, met wonderful artists, and grown in my own work. Each year SAQA holds a Reverse Auction, the proceeds of which are used to support SAQA exhibitions, catalogs, and outreach programs.
Members can contribute one 12 x 12" quilt, which are collected on the SAQA website, and which are auctioned off, in groups, beginning on September 12th, 2011, starting at 2 pm Eastern Time.
You can learn about how the reverse auction works AND see all the quilts by going to the SAQA site. Just google "SAQA Benefit Auction 2011" and it'll take you right there. But don't dilly dally; those quilts go like hotcakes!
Here's a picture of my little contribution. It's called "A Cubist Got Into My Studio!"
* note iron, spray starch, pens & brushes, rolling cutter, tomato pincushion, and threads.
* * * *
I submitted a quilt to an amazing exhibit in Philadelphia, curated by Michelle Flamer (below). The show is called THE PRESIDENT'S HOUSE: Their Untold Stories in Quilts. The stories that are told are about the slaves that George Washington brought from Virginia to Philadelphia, where the first Executive Mansion was erected. The terrible irony is that the 9 enslaved people were taken to the FREE state of Philadelphia, where slavery was outlawed! Each of these 9 people are celebrated in quilt art by a total of 55 quilters.
Here's a photo of me with a group of kids (ages about 7-12), each of whom made a block for their group contribution. One little 7 y.o. proudly told me she was a 4th generation quilter. They were so happy to be part of the celebratory weekend we shared. (and don't you like my halo?)

Perhaps the most iconic and striking quilt was that made by Carolyn Crump (below), whose work is just exquisite. Here she shows Mr. Washington atop his 9 household slaves, with the original house on one side and quilt square images which resemble Masonic shapes on the right (unfortunately not visible in my photo). Carolyn's quilt was used in all the advertising for the show.
Another quilt I liked very much was that of Marjorie Diggs Freeman, of Durham, NC; her own great-grandfather was born into slavery. Her quilt depicts each of the enslaved residents of the "white house", each with a little story, and linked by a chain (which she painted on).

My quilt, "Let Freedom Ring", was made to honor Ona Judge Staines. Oney
was the daughter of a white indentured servant and a black field slave at
Mt. Vernon. We knowa bit about how she looked from the "Wanted" posters
sent around the country by Mr. Washington after Oney fled, and we know
more about her because she was twice interviewed by abolitionist newspapers
in the 1840's. At 16, she was Mrs. Washington's personal servant, and
apparently an excellent seamstress. Friends she made in the marketplace
aided her in planning her escape, and one evening, after she set the plates
on the table, Oney ran to hide out on a sloop out of Portsmouth, N.H.
Despite several serious attempts to have his "property" returned, Washington's
wish to have her kidnapped and brought back to him were thwarted.
Oney married and had three children, all of whom predeceased her.
Living alone in the north of New Hampshire, Oney's neighbors helped
sustain her with food and wood for her fire. She often said that although
her life had been very hard, at least she had lived free.
Although we have no image of Oney, I imagined her looking us straight
in the eye, in front of a collage of freedom bells, boy scout slogans, and
other Americana symbols -- asking us to truly let freedom ring.
* * * *
Do you realize that we are almost at the 10-year anniversary of 9/11?
The Fiber Artists of Hope (sort of the "daughters" of the original Obama Mammas)
are working on a quilt show to remind us of that dreadful day....and the
disastrous years that followed for our country. Many of us have made small
quilts (9"x11"), and some larger ones as well. We're hoping to find a few
more venues in which to share this work. The organizer for this 9/11
project is Jeanette Thompson, one of the amazing, creative people
I've come to know over recent times.
Anyway, here's my small contribution to the show:

It's simply called "Oh, no!"
* * * *
If you've been patient enough to read to this point, I salute you. I promise I'll update more
frequently; that'll be easier on both of us!
Here's a hint of what I'm working on now. It's just a fence, outlined on a long sheet of white fabric, and each wooden twig done in a different fabric. I think it's going to be pretty big, and I have lots of puzzles to solve about how to hang it. Here's the first picture I took of it:
So, thanks for visiting, and remember, I'd love to hear your thoughts and comments on this blog post.